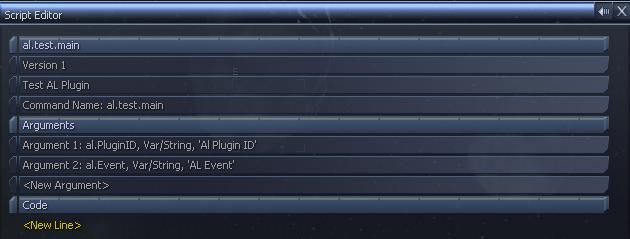
Step 1 - Setting up the Arguments
Step 2 - Setting up Initial Script
Step 3 - AL Plugin Settings Array
Step 9 - Registering the AL Plugin
The first thing you need to create is the event callback script, this is the script that is called when ever the AL event is triggered. Just create the script like normal, and it requires 2 arguments, the first is the AL Plugin ID, which is a string, and the 2nd is the Event thats called, this is also a string.
When the AL Plugin is registered, the game engine will assign a unique identifier to the plugin, this is giving a string id to allow you to set properties and control the plugin.
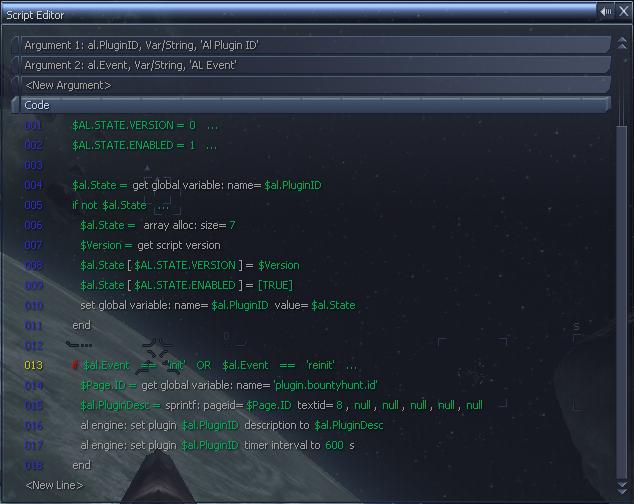
As discussed previously, the event script needs 2 arguments, set these as both type var/string.
This first for the Plugin ID and the second for the Event String.
The game engine doesn't actually keep a record of the AL Plugin status, like if its on or off, you have to store this yourself. You can do that by creating an array to store the settings for the plugin, ie the version of the script and weather its on or off, and anything else you think you might need. Version is handy so you can detect when an update is made and make any changes that might be required.
The settings only need to be created once, so you can test if the global varible exists to know if one has been created or not. For the global varible name, you can use the plugin id which is unique and always know in the script.
One thing i do, is first create a few defines to make it easier to read, ie you assign each position in an array to a varible name, so you use the name instead of the number.
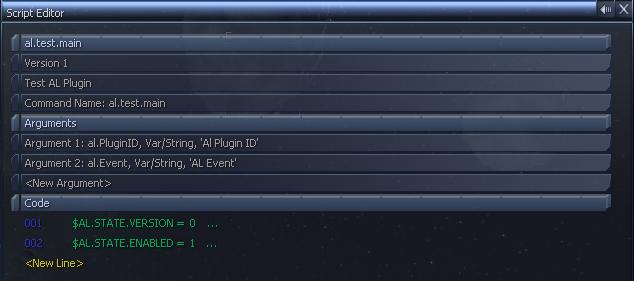
Setting the version to 0 and the enabled flag to 1, this means that the version setting will be stored in position 0 in the settings array, and the enbaled flag will be stored in position 1. If you have any other settings you like to add, you can put them as 2, 3, 4, etc for the position you add them in the array.
Now we need to create the settings array for the AL Plugin, first thing to do is to check if an array already exists, if not, create one.
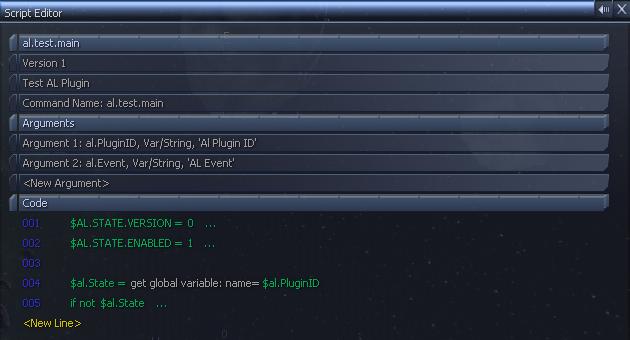
This used the al plugin id string as the global varible, in this case the varible is $al.PluginID. If you have previously created the array this will be returned, otherwise it will need to be created. The IF statement will check if it needs to be created.
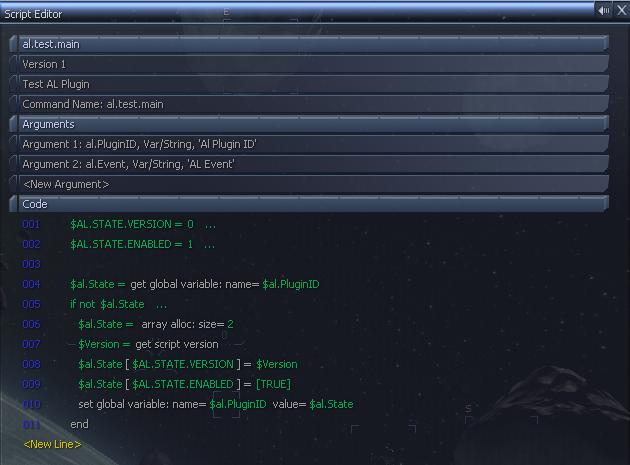
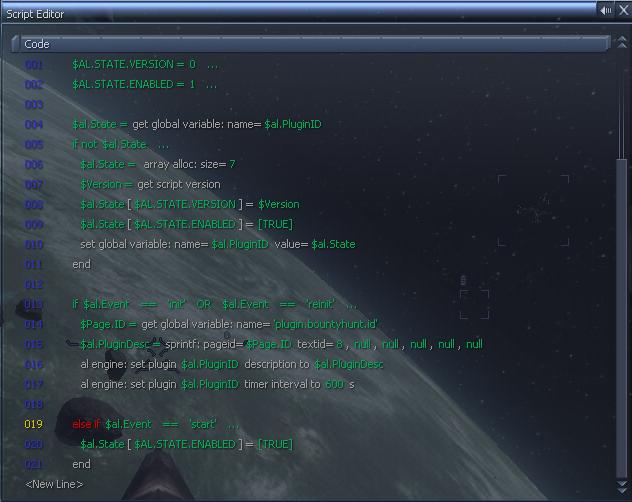
First you need to create the array, for what ever number of settings you require, for this we will just use 2, for the version and enabled flag. Then we can assign the settings into the array, using the defines created previously instead of the position numbers. You can then set the enabled flag to [TRUE] or [FALSE] depending on if you want the AL Plugin to be enabled or disabled from the beginning.
Finally you need to save the array to the varible using the set global varible command.
Now we have everything setup we can test which event currently called the script, this is stored in the event string, the second argument. A simple if statement can check what event it currently is. This first event we'll check for is the init and reinit event. The init event is called when the plugin is first created and the reinit is called when its recalled, ie when you reinit script caches.
This is the event where we need to set the AL Plugin settings, the description and the timer.
The if statement on line 013 checks the event string against the string "init" and "reinit". So its basically used for 2 different events.
Line 016 sets the description for the plugin, this is the text that will be displayed in the AL Settings menu. In this case, we use a standard text file to get the text and set it to the ID. For any AL commands, you will need to use the id string, the first argument of the script.
Line 017 is the timer interval, this sets the timer for the AL Plugin. The timer allows you to do something after a set time interval, ie setting it to 10 seconds, will cause it to do something every 10 seconds. You dont need to use a timer if you only want the enable/disable options.
The al engine commands can be found in the General Command menu.
The start event is called when the user enables the AL Plugin, ie sets it to "Yes" in the menu. For this we need to change the settings array, the enabled flag to true.
This is always where you can do anything else that might be required when starting the plugin, ie, any initiation that needs to be done when its enabled. This is different to the init event as the init event is called when the Plugin is created, the start event is called every time the plugin is set to yes.
This is like the start event, but is called when the plugin is disabled, or set to "no". Like the start event, you just need to set the enabled flag to false. This is also a good place to do any clean up that might be required. IE if the plugin is used to create stations or ships in the universe, the stop event can be used to remove these stations and ships from the universe.
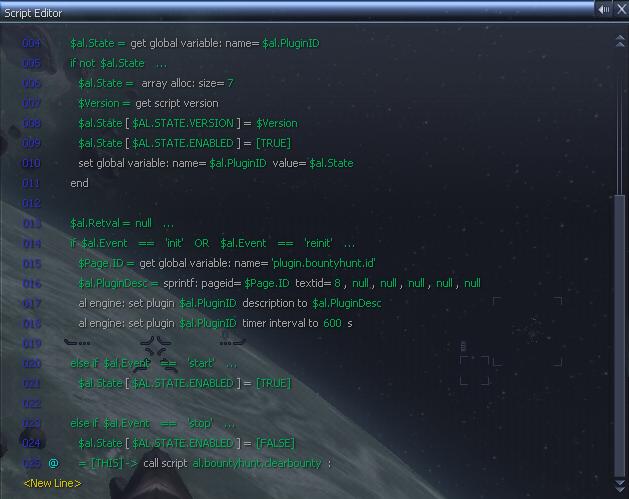
Line 025 calls a script to remove the bounties from the universe, this was used in the bounty Hunters Guild script.
The isenabled event is used to check the status of the AL Plugin. This is called when you view the AL Settings, so the game knows weather to display it as enabled or disabled. For this you can simply return [TRUE] or [FALSE]. This is one reason for the Enabled flag, so you can return the flag for the correct status of the plugin.
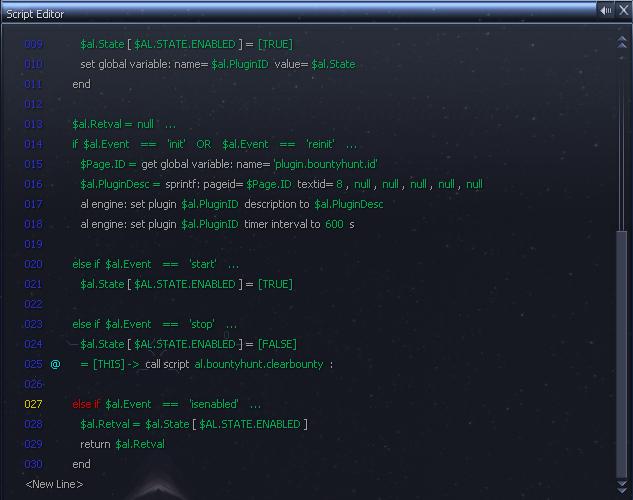
For this event, you must return the value, this simply returns the enabled flag.
The timer event is called at each interval of the timer, so if you set the timer to 10 seconds this event is called every 10 seconds. A good idea for this is to call a seperate timer script. The reason for this is that when you register the AL Plugin, the main script is cached, so for testing the changes wont take effect straight away, this makes calling a seperate script useful as the seperate scirpt wont be cached, so each time its called it will use all the changes you've made. It also keeps it neater instead of having everything in the same file.
Another good idea is to only call the script if the AL Plugin is enabled by testing the enabled flag.
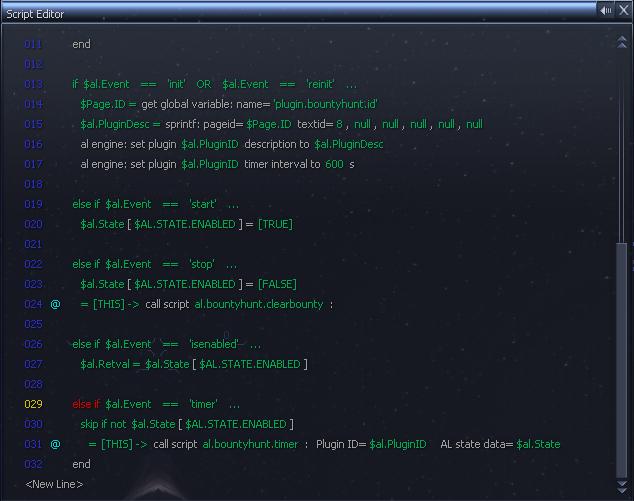
Im also sending in the settings array and the plugin ID, these arn't needed, but you might want to check them in the timer script for something.
This is all thats need for the Event Script, the timer script is just a standard script so it depends on what you want the plugin to do.
The final step is to actually register the AL Plugin into the game engine so the event script can be called. This is done simply by telling the game what the event script is and the rest will be handled by the game engine and event script.
This is best done using an al.plugin file, any file beginning with al.plugin will be loaded automatically at the start of the game like setup scripts.
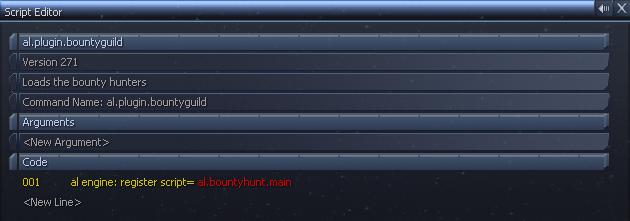
You just use the register script command found in the General Commands menu. Then you set the argument to the event script you created before.
The register script isn't stored in the saved game, so you have to register each game load, which is why its a good idea to use it in an al.plugin file.
| << Prev (Creating a Hotkey) |